NOTE: Performing procedures below may corrupt your motherboard's BIOS if not done properly. I don’t take any responsibility for anything that results from following these instructions (good or bad). You’re following these instructions at your own risk.
Let's start - this instruction is originally from HP Forum created by Justin Maslack. Download the Crisis Recovery file here.
I had to apply these instructions as I have Windows XP installed in my HP Pavilion dv2000 (dv2533) laptop. After 1.5 years, my motherboard died, I had to replace it and re-downgrade BIOS to version F.13. The seller where I bought the motherboard (PCSuperFreak on eBay) flashed the BIOS with the latest version (version F.2E at that time).
When I downloaded BIOS version F.13 and tried to install it, it won't allow it unless I have Vista installed. So, I need to convert the BIOS file to a bootable floppy version using Phoenix Crisis Recovery. I will not tackle how to create a Crisis Recovery Disk in detail. I attached the file compiled by Justin Maslack which can be downloaded here.
The file were arranged in the floppy as:
- minidos.sys
- phlash16.exe
- bios.wph
- Get an external usb floppy drive!
- Extract Phoenix_Crisis_Recovery.7z file.
- Run wincris.exe, select minidos option, do a full format of disk (with no label), let program copy files. Make sure order is correct.
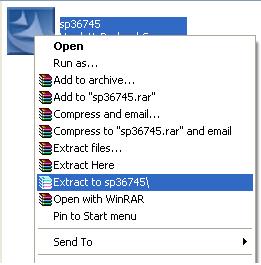
- Go to HP website and download the BIOS version you need. Mine was version F.13 (sp36745.exe). Unzip it on your computer.
- Open the unzipped folder, then go to winphlash folder and find a filename with an extension "WPH" - Usually the filename of that WPH file is described as family ROM (30CD) plus the version name (F13).
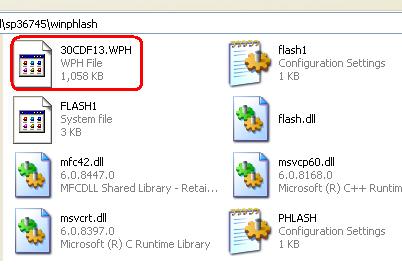
- Rename 30CDF13.WPH (as an example) to bios.wph. Replace the bios.wph file (on the floppy) with one for your machine if it is not dv2533.
- Now your Crisis Recovery disk is ready. On your laptop, hold Win+b while plugging in and pressing the power button.
- Keep holding Win+b until beeping starts and floppy is being read.
- Let the program do the rest (you should hear beeps as the disk is read, a pause break in the beeps, and then more beeps as the bios is flashed). The beep might last for 5-8 minutes.
- The laptop will automatically shutdown.
- Switch on the laptop and you should now have the BIOS version that you want!
- Retry if it does not work...It took me once, but some took four or five times.