The original instruction can be seen here http://wiki.whmcs.com/Importing_Data#Manual_Domain_Only_Entry where I just added some pictures here for better explanation.
To add a domain on it's own without a product, follow the steps below:
- On the client summary page, click the Domain tab.
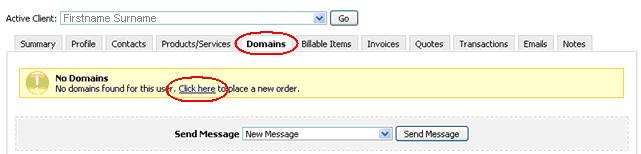
- The Client will be preselected, so you should fill out the rest of the form - begin by choosing the Payment Gateway you want the client to pay with.
- Leave the Product/Service dropdown menu set at None.
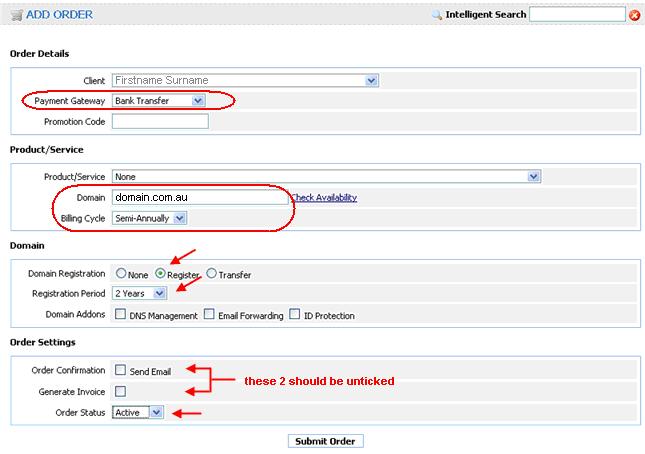
- Enter the Domain in the domain text field, then select the Billing Cycle.
- Select Register as the Domain Registration Option (even though you aren't intending to register it today).
- Select the Registration Period you next want the client to be invoiced for at the time of renewal. '.com.au' has a minimum of 2 years registration period.
- Tick any Domain Addons the user has for their domain, it depends if your Domain Registrar supports those add-on which you have to check with them.
- Ensure both checkboxes for sending an Order Confirmation and Generate Invoice are unticked so the user will not be emailed about this order.
- Finally, set the Order Status dropdown to Active and then click the Submit Order button to add the order to WHMC.
- You will now been shown the order screen summarising the details of the order you just added.
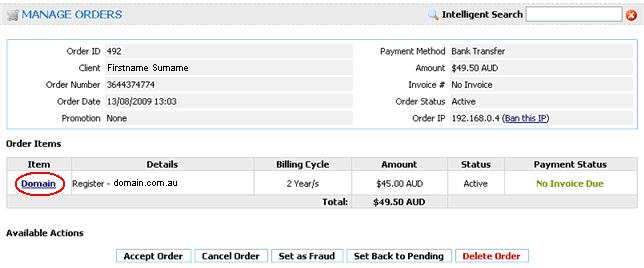
- Click the Domain link so we can go to the domain's information page to complete the procedure.
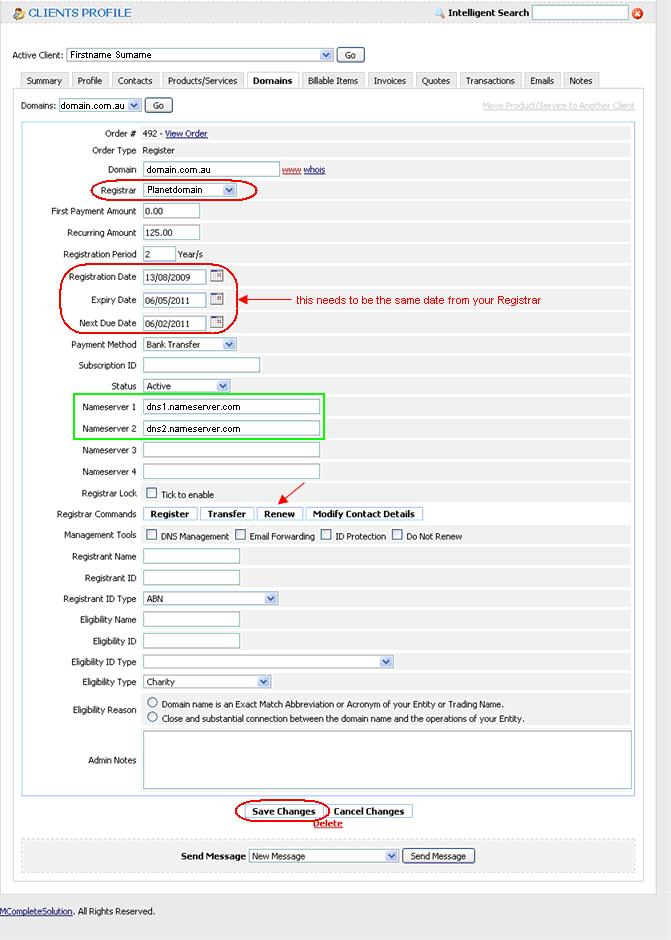
- a. Select your Registrar from the drop-down menu.
b. Enter the Registration Date, it might be the date you first had the client or you can also use the date today. Most of the registrars don't read this date anyway.
c. Enter the Expiry Date, this date should be the same expiry date you have with your registrar.
d. Enter the Next Due Date, this is the date where WHMCS will generate the invoice, it could be 3 months ahead of the expiry date as per picture above. Most registrars doesn't read this thru their API.
e. You can tick Registrar Lock if your registrar support that feature. The same with the Registrar Commands, you have to check with your registrar if they support those features.
f. For the Registrant Name up to the Eligibility Reason, no need to complete it as the details for these were already entered at your registrar's end when you first register the domain.
e. Click Save Changes button. After clicking the save button, you will notice the appearance of the Nameserver 1 & 2 (3 & 4 if you have) - shown in green box in the picture. - Your done with the manual entry of the domain. If you want to renew the domain straight-away for a reason that the client already paid for it ahead of time, you can do it by clicking the Renew button and wait for the 'Successful' note to be displayed somewhere on top of the order.
You have now finished adding your client. By following the steps above, your client will have not been notified that you've added them and will now be invoiced by WHMCS prior to the next due date for the items you have added to their account