After importing emails from Windows Live Mail to Outlook 2013, then importing contacts as CSV (Comma Separated Values) to Outlook, the contacts still would not appear when I clicked the To... button when creating new email.

I've also checked that the Contacts name properties -> Outlook Address Book tab has a tick on Show this folder as an e-mail Address Book


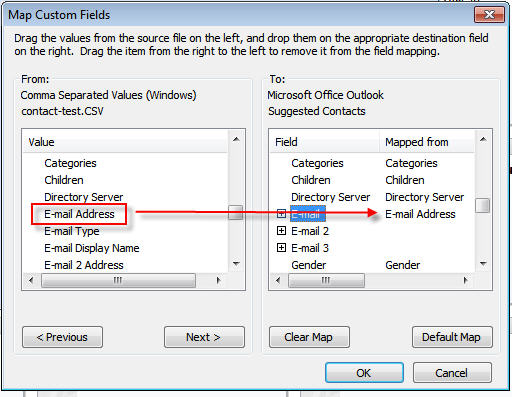
The issue was the email address was missing on all of the imported contacts because the email was not mapped accordingly. So make sure to drag E-mail Address from the left to the right where it says E-mail.

Add a comment

I was working on a HP computer (Windows 8.1) with Microsoft Office Home and Business 2013, Office Home and Student 2010 and Office Professional 2010 installed.

I had to uninstall the Home and Business 2013 because the trial expired.

After the uninstallation, everytime I run Outlook 2010, two unnamed folders were created on the desktop and sending emails thru Outlook would show an error "Not implemented."

The fix for "not implemented" for me was to repair Home and Student 2010 and a computer restart, although Outlook 2010 is part of Office Professional 2010.

Add a comment

When running e2fsck -y /dev/sdc1, I'm receiving the error:

e2fsck: Filesystem has unsupported feature(s) while trying to open /dev/sdb1

Solution:

In my case, the file system of the external USB drive was ext4, reformatting it to ext3 eliminate the issue.

To view the current file system, do the following:

  • Mount the device
    mount /dev/sdc1 /media/usbdisk
  • Issue the command
    df -T

To re-format the partition to ext3 without needing to re-partition:

mkfs.ext3 -L MyLabel /dev/sdc1
Add a comment

Note: This has been tested only on a computer connected to the internet via network cable and not wireless.

  • Login to the computer as local user (eg. user)
  • Install OpenVPN and setup/configure as normal
  • Create the OpenVPN certificate for that new VPN user you want to login as (eg. domainuser) if it doesn't exist
  • Using OpenVPN, connect to your network VPN as the user you want to login the domain profile as (in this case is domainuser)
  • While connected to the VPN, go to Start and Log Off and Switch User
  • Login as different user, type the domainuser and password (this is assuming the computer has been joined to the domain beforehand). Now you should see the Welcome screen and now the profile has been created locally to the computer.
Add a comment

To change the Avery Berkel M202 weighing scale IP address to match your network setup, do the following:


    • Press “service” button near the power plug underneath the scale
      Avery Berkel M202 weighing scale service mode button
    • Flip the keypad board


  • Press “home
  • Press “Communication” -> “Advanced Setup” -> “Machine IP Address
  • Now type the IP address and Gateway
Add a comment